Monday, August 20, 2012

Fabric Wrapped Bracelets


I have what I like to call an "arm pile" - an ever increasing collection of bracelets that almost never come off. I saw some fabric wrapped bracelets on Pinterest (I'm telling you, if you haven't gotten on there - DO IT!! There are SO many gems there!!) and thought "I HAVE to do those!" Seriously, a favorite accessory that I could make cheap, deplete my pile of fabric scraps, and not have to make a special run to Hobby Lobby? I'm there! So I've included directions for two styles, a layered wrap (the two on the left in the pic above), and a "regular" wrap that showcases the fabric pattern.
Supplies:
  • hot glue gun
  • rubber wristband (if you need some, try yard sales. You can pick up a TON for cheap)
  • fabric scraps 1-2 in. wide and 2 feet long
Start by flipping the wristband inside out (so the writing is facing inside) and placing a line of hot glue about an inch long on the wrist band. Place fabric on top of glue. *PLEASE use cation with hot glue. I once gave myself a second degree burn with the stuff.* 


Next, put another small line of hot glue, half on the wristband, half on the fabric. Quickly and carefully pull fabric through and wrap around wristband. 
This is what it should look like as you're going along
Continue gluing and wrapping. Play with tautness, how close your layers are, and pattern alignment if you want. I recommend experimenting with your wrapping before you start gluing. 

Half way done!
The wrapping goes really quickly. When you're ready to finish off, trim down your fabric, hot glue edge, and glue down, making sure the raw edge faces outside.


 Finally, flip bracelet right side out,trim fray if desired, and Presto! you're done! That wasn't so hard now, was it?


For this second bracelet, if you have a pattern you want to highlight that doesn't come out well when you do the previously listed wrap style, like chevron, it's easier to see.

Here, you can better see the second bracelet (it's the one farthest right), along with my arm pile. 
You'll want the exact same width of fabric as the first bracelet, but you won't need 2 feet, just enough to wrap around the bracelet. You'll be safe with about 9 inches. You'll also need some ribbon, bias tape, or rick-rack (this will make sense later).

Start by place a dot of hot glue on the wristband. Center fabric on the glue.


Continue placing dots of glue about every quarter to half inch. When you're ready to end, match up the pattern, trim excess fabric, and glue down.


Flip bracelet inside out. Take ends sticking above and below bracelet, fold down to center, and glue.


Continue gluing around bracelet. Now, this leaves a bumpy finish that's not comfortable when it rubs up against you arms. To fix that, take your ribbon/bias tape/ rick-rack, and glue along inside (well, actually, it's on the outside right now).

Flip back out, and you're done! Both of these bracelets take about five minutes and limited supplies. If you have limited time, these make super cute gifts. The only thing is they get dirty pretty quickly. I just remade these after wearing them everyday for about 6 months and the fabric was pretty icky. Yeah, we're not going there... But, you can just do what I did and rip off the old fabric, reuse the bracelet, and recover if it gets dirty.


Keep Crafting,
-K


Saturday, August 11, 2012

Summertime wrap up


I had the opportunity this summer to babysit a family friend's kid. A tween amateur crocheter, I knew she'd probably enjoy some sewing. Boy, is that an understatement. Every time I'd show up "What are we making today?" Even her mom would start to ask to get in on the fun. However, finding enough crafts that were engaging and easy was a bit of a challenge. If you've ever been in that situation, you know what I mean. So here's my list of "tween-approved" summer crafts. Most of these involve some basic sewing, some just newspaper and a stapler, but they're all fun and relatively easy. Here she is, modeling them all.


 1. Headband from Oh So Happy Together - I absolutely LOVE this tutorial. There's an included pattern, they fit really well, their not too wide, and take about 30 minutes or less to make. I've made about 10 of these - 5 for me, 5 for gifts.


2. Sleeping shorts - Simplicity #9918 *This is an old, out of print pattern* - Sleeping shorts were my first sewing project. Their simple, practical, and really give you a handle on how to work with patterns. I found this owl fabric at Hobby Lobby and was completely sold. You can't see the fabric well, but there are sleeping owls on it. An easy choice when the kid you're babysitting is an owl fanatic.

3. Pillow - flower from McCalls M6047 - Great way to use some fabric scraps!! In this case, just cut 2 pieces of fabric about an inch wider than a pillow form, sew around 3 sides, flip right side out, insert pillow form, and hand stitch bottom closed. The flower takes an otherwise blah pillow to a new level.

4. Owl stuffed animal from Lu Bird Baby - This owl is absolutely ADORABLE!!! Again, using only fabric scraps, you can take this to a whole new level. I think this was my favorite craft of the summer.


5. Curly Bird from Family Fun - Again, another cute little guy. You could even thread some embroidery floss through the paper to make an ornament.

6. Ditty bag - No source for this one, but have hope!! I'm hoping to roll one out soon!! This bag is great for grabbing a change of clothes, or holding your basic cosmetics to throw into an overnight bag.

7. Melted Crayons - Preheat oven to 350. Grab a mini muffin tin and line with wax paper or mini cupcake liners. Place broken crayons in tin. Place tin in oven for 5-8 min, Let cool and color. If you have crayon stick to the tin, learn how to clean it here. Have fun mixing the colors.


8. Recycled t-shirt bowl from Family Fun - So this was supposed to be a rug, but we pulled the fabric too taught at the beginning and slackened as we went. The "rug" started taking a natural bowl shape, so I figured "why not fight it?" Sometimes things turn out cooler than you thought they would.


 9. Drip Paint pot form Clever Nest - so these things have been all over Pinterest lately, and I wanted to give it a shot. It turned out SO cool!!!


10. Newspaper Basket from How About Orange - These are quite easy, and I love that they're made out of newspaper. These make a great catch-all for the things that float around your living room.

Saturday, August 4, 2012

Cupcake fun!!

I love making desserts, then munching on them until I realized I ate about half of what I made (but I'm sure I'm not alone on that). Finding new recipes and trying them out is so much fun. Running into recipies that make me go "That looks amazing! I need to go try that - NOW!!" doesn't always happen, but when I ran across this recipe for peanut butter filled brownie cupcakes, I couldn't help but think that. They turned out so yummy!! I even broke out the frosting and had some fun.


Ingredients:

Brownies:

  • 1/2 cup (1 stick) butter or margarine, melted
  • 1 cup sugar
  • 1 teaspoon vanilla extract
  • 2 eggs
  • 1/2 cup all-purpose flour
  • 1/3 cup Cocoa
  • 1/4 teaspoon baking powder
  • 1/4 teaspoon salt
*Note: if running short on time, you could use a brownie mix, but for me, the extra effort of homemade  brownies goes a long way*


Filling:

  • 1/3 cup smooth peanut butter
  • 1 1/2 oz. cream cheese
Optional:
  • peanut butter cups
  • frosting
Directions:

  1. Preheat oven to 350
  2. Stir together butter, sugar and vanilla in bowl. Add eggs; beat well with spoon. Stir together flour, cocoa, baking powder and salt; gradually add to egg mixture, beating until well blended.
  3. Line 16 to 18 cups of a standard muffin tin with bake cups. Combine the filling ingredients in a medium-size bowl and beat them with an electric mixer until evenly blended. The texture should be like whipped peanut butter. If it's not stiff enough, add a little extra peanut butter.
  4. Fill each muffin cup about halfway with brownie batter. Spoon about 2 teaspoons of peanut butter filling into the center, pushing it down slightly into the batter. Cover the filling with another spoonful of batter, making sure that the cups are no more than about two thirds to three quarters full.
  5. Bake for 15 to 17 minutes, just until well risen and cracked on top. Then transfer the pans to a wire rack and cool for 30 minutes. Remove the brownies from the pan and place them directly on the wire rack to finish cooling (they'll sink as they do) before serving.
  6. Once cooled, ice as desired. Cut peanut butter cup into 6 pieces, and place 1 piece on top of icing.
Yield: 18 to 20 brownies


Adding the filling is a little extra work and clean up, but SO worth the effort. Upon bringing these to bible study, they were gone in a matter of minutes.

You could eat them, or put them on a pretty platter and admire your work :).


      Saturday, July 21, 2012

      Dress Extension


      Is it just me, or are dresses getting shorter? These "barely dresses" are barely cutting it, especially at my height. But when I found this dress at Goodwill for $3.50, I couldn't pass it up. It was a little short, but when I found some knit fabric that matched, a dress extension was the plan.


      Supplies:
      • dress 
      • coordinating fabric (try to match fabric type to fabric type. Knit to knit, cotton to cotton, etc.)


      First, if needed, seam rip. My dress was a bubble style. The inside panel was sewn to the outside panel, so I had to seam rip the entire bottom.
      If seam ripping isn't needed, spread out the bottom of your dress as much as possible, and measure the width on one side. 
      Decide how much length you want added to your dress. If you're using cotton fabric, double the length. This makes it easier on you since you won't  have to hem (just wait - this will make sense a little later). If you're using knit, you can double the length, or just leave it be. Knit doesn't fray, so you don't have to worry about hemming.


      Take your measurement of how wide the dress is, and double it to find out how long you need your extension panel piece to be. Once you get that number, cut your coordinating fabric. A rotary cutter works great for this. Try to cut enough fabric to match the pattern of the coordinating fabric when you sew the sides together.


      If you're using cotton, press your fabric on half, width-wise, wrong sides together.
      Start pinning your fabric at the seam line on the dress, right sides together, with raw edges being pinned to the dress.


      Continue pinning, keeping the fabric straight and taught, until you have about 3 inches left, and sew the panel together.

      Pin the remaining 3 inches, and sew panel to dress.


      That's it! You now have a dress that's actually long enough, and completely customized by you. My dress rung up at under $5, since the dress was from Goodwill, and the fabric was under $3 a yard on clearance (don't you just LOVE that?).


      Shout out to a friend who helped me with the final shots!

      Keep Crafting,
      -K

      Linked:


      Saturday, July 14, 2012

      Cow Appreciation Day

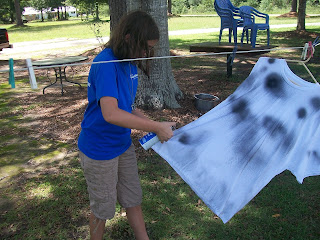
      For all you who don't know, Cow Appreciation Day was yesterday at Chick-fil-a. Dress up as a cow, get a free meal. Doesn't get any better than that. As an added bonus, we even had awful puns floating around my house all day yesterday. After dressing up for 3 years now, we finally caved in and spray painted shirts (I figured this would make an interesting tutorial).

      Step 1: Spray

      Step 2: Wear
      Best when done with friends

      We had to get a 2XL pack to fit my dad, so I just wore leggings underneath (hey, the shirt was actually long enough to be a dress). I was "a model for over the moon shampoo" to quote a friend. We enjoyed our free meals and created some more bad puns. I'm suppressed we didn't get kicked out, we were so loud. I guess that's what happens when you dress up in crazy costumes with friends.

      Keep Crafting,
      -K


      Saturday, June 30, 2012

      DIY Lanyard


      Since I'll need a lanyard for my ID next year, I started looking. I fell in love with these from Vera Bradley, but refused to pay $12.
      Upon more thought, I realized, Hey! these don't look to hard to make! I even have some fabric that's really close to the lanyard pictured here.

      So, with that in mind, here's your supplies:

      • scrap fabric (I used duck cloth because it's durable. I wouldn't recommend knit at all. You can use cotton, but a thicker fabric is best.
      • lanyard clip ( I clipped mine off a key chain I wasn't using - talk about thrifty crafting! - but most craft stores carry them, I imagine they'd only be $3 or so).

      That's seriously it! These things cost so little since you're using scarp fabric, mine came in for practically free! Beats $12 any day.

      Anyway, the first thing you want to do is cut a 37 in. by 2 in. piece of fabric. A rotary mat and cutter works wonders for this. Don't worry if your lines are jagged, they'll be hidden.


      Next, break out the ironing board. Iron your fabric in half to get a nice crease line.


      Unfold your fabric, and press one end into the center. Do this on both sides.


      Now fold the piece in half as to hide the raw edges. Press (don't worry - this is the last of the ironing).


      Pin along the non-folded side. Now, hop over to your sewing machine. Sew straight up your pinned side. Have as little seam allowance as possible.


      After that, straight stitch the ends, and then sew them together. Loop your fabric through your lanyard hook, and sew.

      And that is that! It really doesn't take that long at all!

      If you're looking for something to put on the end of the lanyard, check out this tutorial. It's an ID case, another Vera Bradley knock off. It's up next on my sewing list.

      Don't know if you noticed my nails or not - it's one of my favorite colors, Cream Pink by Sinful Colors. It's only $2, and really high quality

      .                             

      Keep Crafting
      -K


      Saturday, June 23, 2012

      Money Jars

      While hanging out with a friend of mine one day, she started talking about these neat savings jars she made. Intersted, I asked her to show me. They were so stinking cute!!! Upon closer look, they also looked super easy. I asked her how she made them and after the run-around, she came up with the idea of a blog post. So, I did.

      Most of the supplies are available around your house.

      • small mason jar
      • duct tape (colored is best)
      • scrap fabric
      • permanent marker
      • scissors
      First, take the duct tape and wrap it around the jar, making sure to keep the tape straight and to create minimal air bubbles.


      Next, remove lid and take 2 strips of fabric, placing them with a slight gap between.


      Place lid back on. It's easier to do if you hold the fabric taught to the sides. Trim fabric to desired length.


      Finally, label the jar. These can be great tools to teach your kids money management. Make three for spending, saving, and giving.


      And volia! you're done (didn't I tell you they were cute)!

      Keep Crafting,
      -K

      Linked to:
      Related Posts Plugin for WordPress, Blogger...